To Add Registered Contents
Step 1-1. Click "Add Content" Link
Click "Add Content" link on the portal or "Add Content to Portal" in Portal Design Preferences.
"Add Content" link for "Public", "Group" tab is displayed only for administrators.
|
Portal

Portal Design Preferences Screen

|
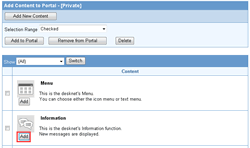
Step 1-2. Click "Add Content" Link
[Add] button in the content you want to add.
|
|
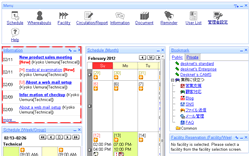
Step 1-3. Back to the Portal
The content you added is displayed.
|
|
2. To Add More Than One Contents
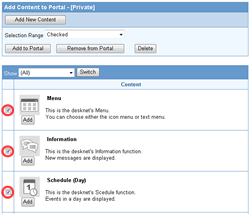
Step 2-1. Select Contents You Want to Add
Select contents you want to add from the contents list.
In [Selection Range], you can choose the selection range.
|
|
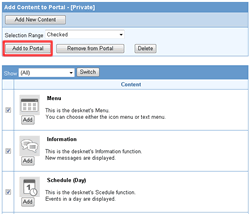
Step 2-2. Click "Add to Portal" Button
Click "Add to Portal" button.
|
|
Step 2-3. Click OK Button
A confirmation message will be displayed. Click [OK] button.
|

|
|
|
To Register New Contents
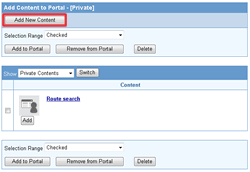
Step 3-1. Click "Add New Content" Button
Click [Add New Content] button.
* If you have clicked [Add Content] and the setup screen is displayed, the setup screen for private contents will be displayed. If you are in "Public" or "Group" setup screen, the setup screen for common contents will be displayed.
|
|
Step 3-2. Enter or Specify the Information
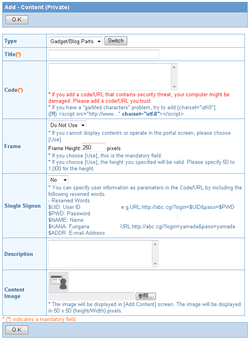
In [Type] field, choose Gadget/Blog Parts or URL. And specify the information.
|
|
Type: Gadget/Blog Parts
You can add a gadget and blog part as a content.
| Field |
Description |
| Type |
Choose the type of content. |
| Title |
Enter a title in [Title] field. |
| Code |
Enter HTML text of gadgets or blog parts. |
| Access Rights Settings |
If you want to set users to browse content, click [Select] in [Access Rights Settings]].
* The access rights can be set to only for the public contents.
|
| Frame |
Whether use frame or not.
If you cannot use drag & drop or open the content, choose "Use".
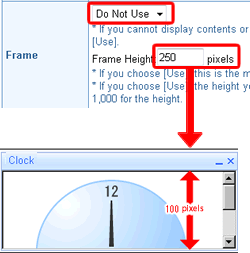
If you choose "Use", enter Frame Height.
* If you choose [Use], the height you specified will be valid. Please specify 50 to 1,000 for the height.
|
| Single Signon |
Whether use Single Signon or not.
* You can specify user information as parameters in the code field by including the following reserved words.
Reserved Words
$UID: User ID
$PWD: Password
$NAME: Name
$KANA: Nickname
$ADDR: E-mail Address
e.g.
URL:http://abc.cgi?login=$UID&pass=$PWD
|
URL:http://abc.cgi?login=yamada&pass=yamada |
| Description |
Enter the description of the content.
The text will be displayed on the content add screen. |
| Content Image |
Enter the image of the content.
The image will be displayed on the content add screen. |
|
Type: Gadget/Blog Parts Screen
If you choose "Use" and set Frame Height, the content is displayed as the following.
|
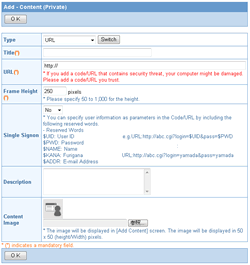
Type: URL
You can display a web page as a content.
| Field |
Description |
| Type |
Choose the type of content. |
| Title |
Enter a title in [Title] field. |
| URL |
Enter the URL. |
| Access Rights Settings |
If you want to set users to browse content, click [Select] in [Access Rights Settings].
* The access rights can be set to only for the public contents.
|
| Frame Height |
Specify the window height.
* Please specify 50 to 1,000 for the height. |
| Single Signon |
Whether use Single Signon or not.
* You can specify user information as parameters in the URL by including the following reserved words.
Reserved Words
$UID: User ID
$PWD: Password
$NAME: Name
$KANA: Nickname
$ADDR: E-mail Address
e.g.
URL:http://abc.cgi?login=$UID&pass=$PWD
|
URL:http://abc.cgi?login=yamada&pass=yamada |
| Description |
Enter the description of the content.
The text will be displayed on the content add screen. |
| Content Image |
Enter the image of the content.
The image will be displayed on the content add screen. |
|
Type: URL
|
Step 3-3. Click [OK]
Click [OK] button to create the content. The content will be displayed in the content list.
|
|
4. To Edit a Content
Step 4-1. Click "Add Content" Link
The same as the step 1-1.
|
|
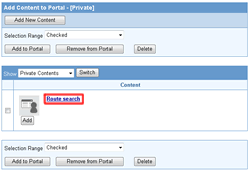
Step 4-2. Click "Title" Link
Click "Title" link.
|
|
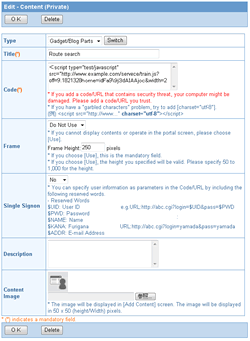
Step 4-3. Enter or Specify the Information
Enter the content.
|
|
Step 4-4. Click [OK]
Click this button to save changes.
* Click [Delete] button to delete the content.
|
|
5. To Delete Contents
Step 5-1. Click "Add Content" Link
The same as the step 1-1.
|
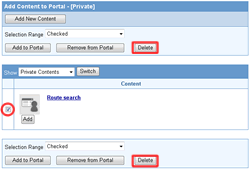
Step 5-2. Select the Contents You Want to Delete
Select the contents you want to delete in the [Selection Range].
Step 5-3. Click [Delete]
When you click delete button a confirmation message will be displayed.
Step 5-4. Click [OK]
Click [OK] button to delete them.
|
|
6. To Delete a Content in the Edit Screen
Step 6-1. Click "Add Content" Link
The same as the step 1-1.
|
|
Step 6-2. Click "Title" Link
Click "Title" link.
|

|
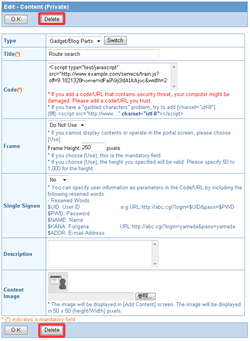
Step 6-3. Click [Delete]
When you click delete button a confirmation message will be displayed.
Step 6-4. Click [OK] Button
Click [OK] button to complete.
|
|