To See Your List of Tasks (Main Screen)
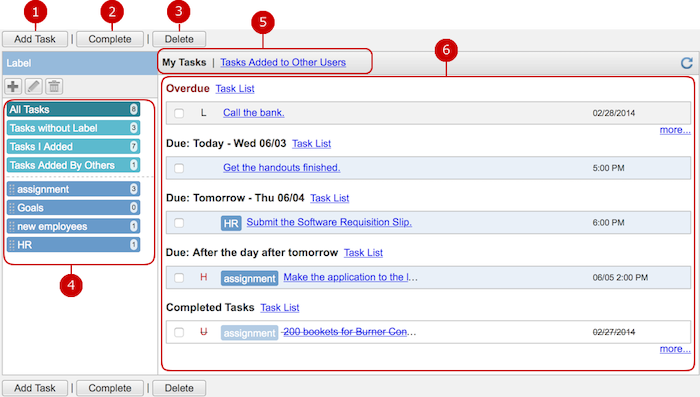
This is the screen showing your list of tasks.
The list is divided into "Overdue," "Due: Today," "Due: Tomorrow," "Due: After The Day After Tomorrow," and "Completed Tasks," in basically chronological priority order.
You can add, edit, delete, and even label your tasks.
-
Add Task adds a task.
-
Complete marks tasks as completed.
This button marks tasks, which are selected in the list, as completed. You can select one or more tasks at the same time.
-
Delete deletes tasks.
This button deletes tasks selected in the list. You can select one or more tasks at the same time.
-
Labels classifies tasks. Click one of them to retrieve tasks connected to it.
-
All Tasks finds all tasks you or someone recorded on you.
-
Task without Label finds non-labeled tasks including new tasks.
-
Tasks I Added finds all tasks you recorded on yourself.
-
Tasks Added By Others finds tasks someone recorded on you.
-
The other labels added by you find tasks connected to each label.
You can add, edit, and delete labels here. (For more information, please refer to To Manage Labels .)
-
These links switches between the list of your tasks and others' ones added by you.
-
This is the list of tasks.
It is divided into "Overdue," "Due: Today," "Due: Tomorrow," "Due: After The Day After Tomorrow," and "Completed Tasks".
First few letters of a task show up in the list and they help you to know what the task is, without seeing the details.
To see the details, click the link of the task. Click a "Display All" link to show a whole list of its divided tasks.
If a task has a label, it is placed at the beginning of the task's text. (You can remove the label by clicking it.)
A link labeled "more..." appears if the number of the tasks exceeds the setting value of the "Number of Items/Top Page."
To Create a Task
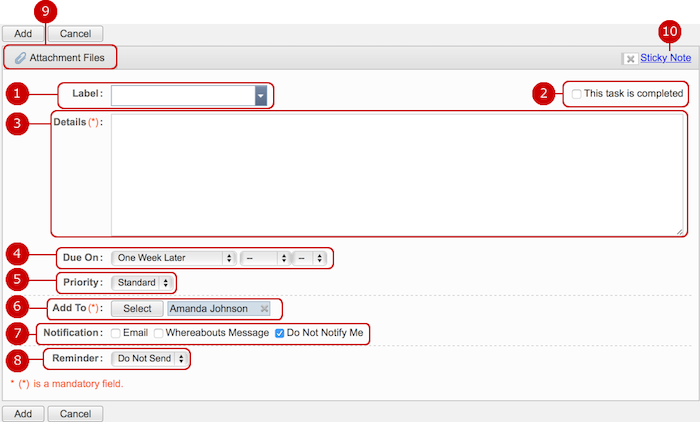
Click "Add Task" and go to Add Task screen.
-
Add a label to classify the task.
You can select any of saved labels on the list shown by clicking the white "▼" mark, or add a new one by typing in the box.
-
Check the box to mark the task as completed.
-
Enter the details of the task. (Required)
The first few letters on the first line will appear in the list of tasks.
-
Set the due date.
-
Select a priority level from "Urgent," "High," "ordinary," and "Low."
You can choose either "Urgent", "High", "Normal" or "Low".
-
Select whom the task will be recorded to.
You can involve more than one person to share a theme which is discussed among them.
Click "Select" to open Select User window.
* You cannot select a person whom you do not have the right to add a task for.
-
Check the boxes to set whether and how you would like to send a notification of the new task to added users.
* The initial value appears selected according to the "Notification" setting in [Personal Settings > Display Settings] and [System Settings > General Settings].
-
Due date reminder emails will be sent before the task is overdue, if you want.
Select "Send" and set when and how to send alarms.
-
You can add files related to the task.
Click the button to open Attachment File window and select files you need. Choose files you want to attach.
-
After saving the task, its new Sticky Note item will be recorded automatically with the color you choose here. Please refer to the explanation of Sticky Note for more details.
Click "Add" button to save and add the data.
To See the Details of a Task
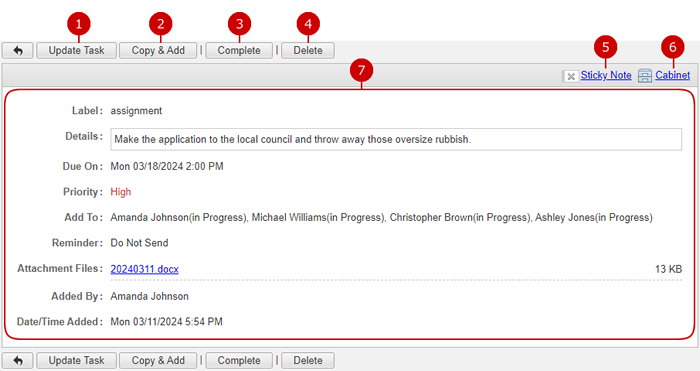
Click the link of a task in the list and go to Details of Task screen.
-
Update Task shows Edit Task screen of the task.
-
Display the [Add Task] screen which duplicates the content of the task you are viewing.
-
Complete marks the task as completed.
-
Delete deletes tasks.
-
When you press Sticky note button, you can copy the information to a Sticky note. Please refer to the explanation of Sticky Note for more details.
-
You can add a new cabinet item of the minutes by clicking "Cabinet" here. (Please refer to the explanation of Cabinet for more details.)
-
Here you can see the details of the task.
To Edit Task
Click "Update Task" on the Details of Task screen and go to Edit Task screen.
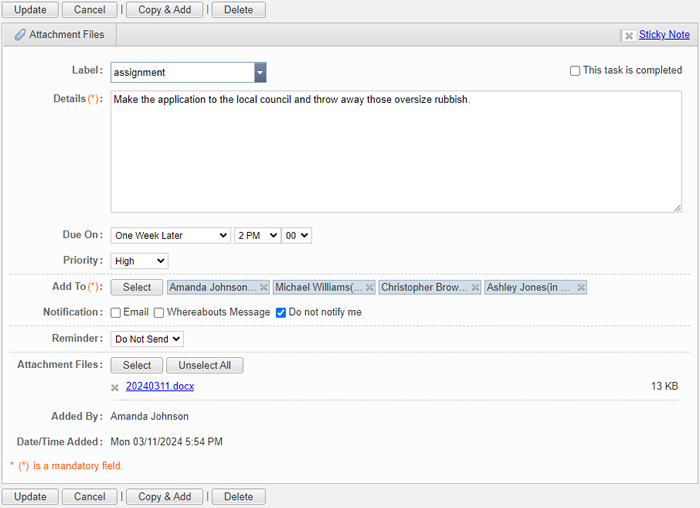
To unselect an attachment file, click "x" before the file name.
When a person who created a task marks it as completed, all the same tasks recorded to others will be also completed.
You cannot edit Add To, Reminder, and Attachment Files of a task which was not created by you.
Even when you mark it completed, only your task will be changed.
Click "Update" button to save the changes.
* Data/Time Added is when the task was created. It remains even after updated.
To Delete a Task
On Item Management And Check In/Out, Item Details or Edit Item screen, click "Delete" and Confirmation dialog will appear.
The task will be deleted right after clicking "Yes." Be careful about deleting tasks because you can never get the deleted data back. The tasks will be permanently deleted and cannot be recovered. Please take note.
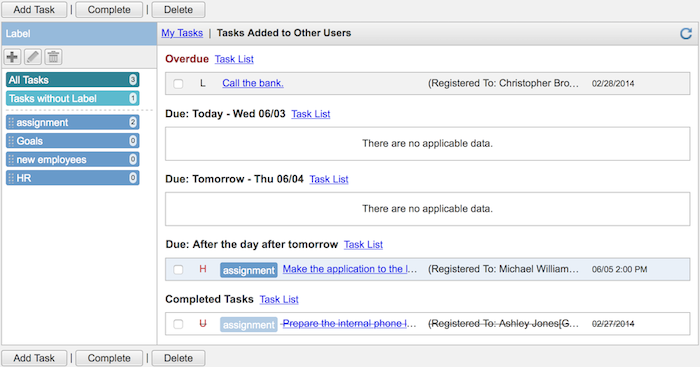
To See Tasks You Recorded on Others
Click "Tasks Added to Other Users" and you will see the list of tasks you recorded on other users.
The list is shown in the same way as on My Tasks.
* The list of tasks, which you recorded on other users, does not have labels named "Tasks I Added" and "Tasks Added By Others."
To Manage Labels
You can add, edit, and delete labels in the list of labels area on Main screen.
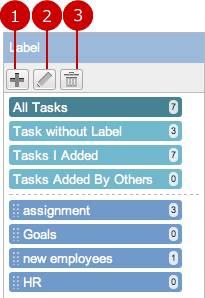
-
Add Label creates a new label.
Click the button to open Add Label window. Enter a label name and save.
(Label name that too long will be shorten when being displayed in the label list.)
-
Edit Label edits a label.
Select a label and click Update button to change the label name.
Enter a label name and save.
-
Delete Label deletes a label.
Select a label and click Delete button to delete the label.
The label will be deleted right after clicking "Yes" and classified into "Tasks without Label."
- To Apply a Label to a Task
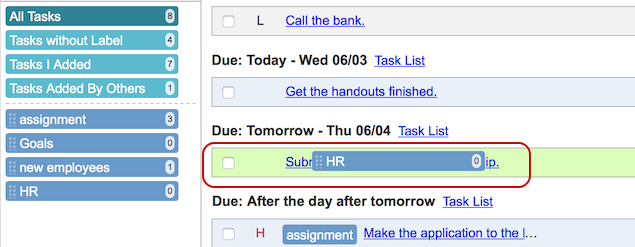
* To apply a label to a task, hold the label and move it upon the task item. The new label will be set.
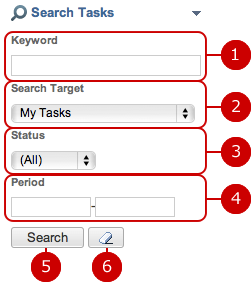
To Search Tasks
The option area of Side Pane has the Search Tasks feature.
You can search tasks with various criteria including Keyword, Search Target, and Status.
-
The search finds tasks which contain the words you typed in Keyword box.
* If you want to specify more than one keyword, use space to separate keywords.
* Specifying multiple keywords will perform "OR" search. This means the search results contain either one or more keywords that you specified.
-
The search finds tasks in Search Target: My Tasks, Tasks Added to Other Users, or All tasks.
-
The search finds tasks with Status: Active, Complete, or All tasks.
-
You can specify Period by clicking a date in the calendar, which appears by clicking a date input box.
* Please use the date format of "MM/DD/YYYY."
-
Click "Search" and you will see the list of results.
-
[
 ] clears all search criteria.
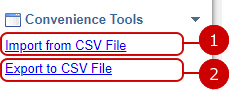
To Use Convenience Tools
When you open the menu on the left side of screen, you can use convenience tools dedicated for Tasks.
This function have the "Import from CSV File" and "Export to CSV File".
-
To Add a batch of Tasks from File (Import)
When you press the link ,CSV Import screen is displayed.
(Please refer to To Add Tasks from File (Import) for more details.)
-
To Save Task to File (Export)
When you press the link ,CSV Export screen is displayed.
(Please refer to To Save Tasks to File (Export) for more details.)
To Add a batch of Tasks from File (Import)
Import from CSV File is one of Convenience Tools which is displayed when the menu on the left side of the screen is open.
When you press the link of Import from CSV File, Import from CSV File screen is displayed.
You can add a batch of events from a file.
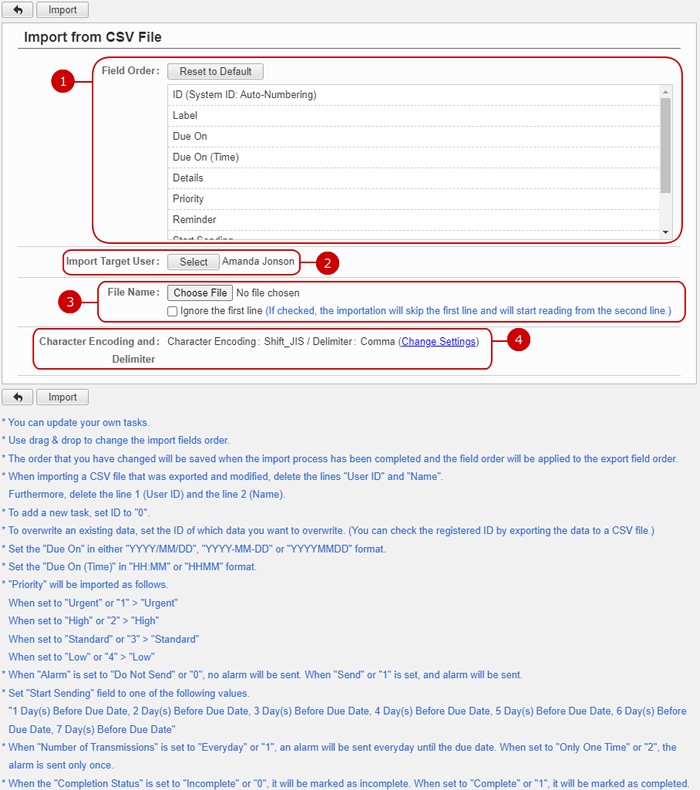
After all entries are completed, when you press "Import" button, importing tasks is started.
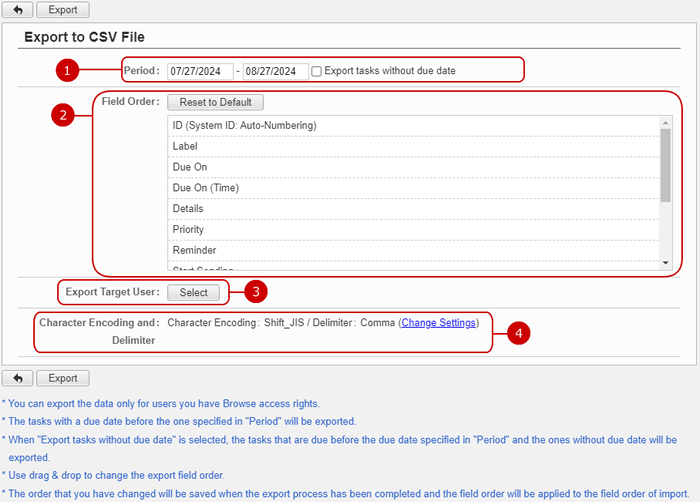
To Save Task to File (Export)
Export to CSV File is one of Convenience Tools which is displayed when the menu on the left side of the screen is open.
When you press the link of Export to CSV File, Export to CSV File screen is displayed.
The registered tasks can be saved to file.
-
Specify the period of tasks to be saved to a file.
When you click an entry field, a calendar will be displayed. Click a date on the calendar, and it will be set to the field.
* Please use the date format of "MM/DD/YYYY."
* The items that are within the due date will be saved to file.
* If "Export tasks without due date" is selected, tasks without due date are also exported.
-
The fields of an event to be saved are displayed. You can change the order of the fields.
* Press and hold down the mouse button over a field name and move the mouse up and down and release the mouse button on desired place to change the order.
-
The tasks are saved in the user selected in the Import Target User.
When you press "Select" button, Select User window is displayed.
(For more details, please refer Common Functions for All Screens > Selecting User/Group/Role in User's Manual.)
* Even when a user is selected in Export Target User, if its not included as an Author it won't be added.
-
Choose a character encoding and delimiter used in the file.
Press Change Settings link to change the character encoding and delimiter options.

-
Choose a character encoding.
-
Choose a delimiter.
After all entries are completed, when you press "Export" button, exporting tasks is started.
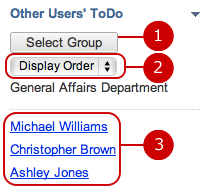
To See Tasks of Others
The option area of Side Pane has the feature to switch other users' ToDo.
You can select a group to find a person you would like to see.
-
Select Group opens Select Group window to choose a group.
-
You can change how to order users list: "Display Order" or "Name Order".
-
This is the list of users. Click the link of a person to see his or her tasks.
