To Display Questionnaires
The list of questionnaires you received or sent are displayed.
You can easily get the picture of who has sent you questionnaires and how long do they open.
You can change status or form to filter questionnaires.
You can create, unread, complete, or delete questionnaires in this screen.
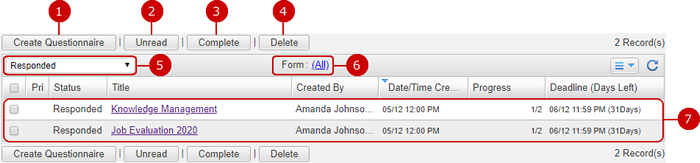
- "The List of Questionnaires" Screen
-
Create a new questionnaire.
-
Mark questionnaires as unread.
Select questionnaires you want to mark as unread and press this button. You can select more than one questionnaire.
* Unread questionnaires are displayed in bold.
-
Change the status to Complete.
This button marks tasks, which are selected in the list, as completed. You can select more than one questionnaire.
* Users other than the originator of a questionnaire cannot complete the questionnaire.
-
Delete questionnaires.
Select questionnaires you want to delete and press this button to delete. You can select more than one questionnaire.
* You cannot delete the questionnaires that are unresponded.
* If you delete a questionnaire you sent, the questionnaire itself and notification data displaying for the received questionnaire on each recipient are deleted.
-
Filtered status of questionnaire are displayed.
You can change it with pull down menu.
(For more details, please refer to following "To Filter Status" in User's Manual.)
-
Filtered form of questionnaire are displayed. You click it to display from chooser dialog, and you can choose form to filter.
(For more details, please refer to following "To Filter Form" in User's Manual.)
-
Questionnaires filtered by status and form are displayed.
You can check Priority, Status, Progress, and Deadline.
When you press a link of Title, the questionnaire details screen is displayed.
* Unread questionnaires are displayed in bold.
- To Filter Status
You click status pull down to display list of statuses.

You choose status to filter questionnaires by it.
- To Filter Form
You click form link in the questionnaire list to open select form dialog, and questionnaire forms are displayed.
* (All) is displayed every time regardless of forms.
* Only common form are displayed. Personal forms are not displayed here.
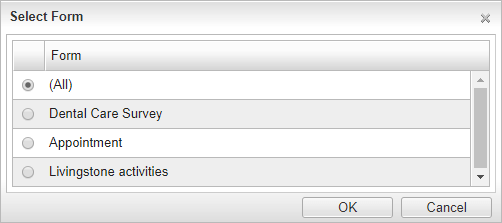
You choose form and click [OK] to filter questionnaires by it.
You choose (All) and click [OK] not to filter questionnaires by form.
To Check Details of Questionnaire
When you press a Title link of a questionnaire you want to read, the questionnaire details screen is displayed.
If you want to respond a questionnaire, use this screen.
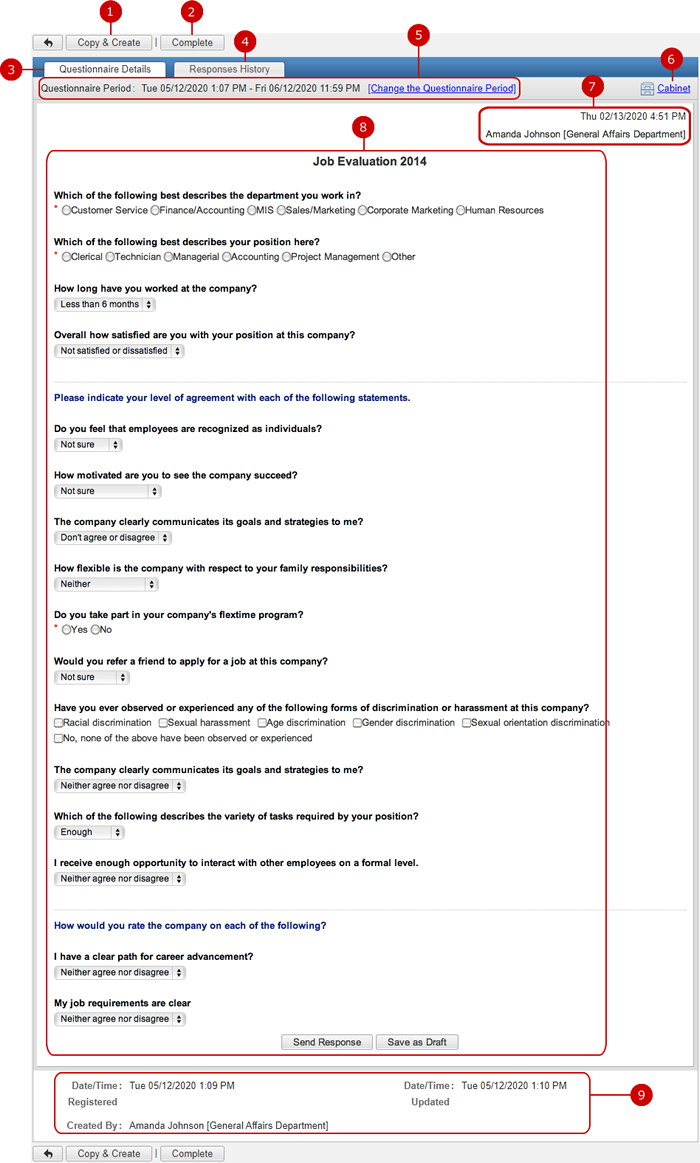
- "Questionnaire Details" Tab
-
Copy the questionnaire displaying and display Add Questionnaire screen.
-
Complete the questionnaire.
* "Complete" button is not displayed for users other than the originator.
* If a questionnaire is completed, "Complete" button is not displayed for the questionnaire.
-
Activate "Questionnaire Details" tab.
-
Activate "Responses History" tab.
* You don’t see "Responses History" tab when the questionnaire creator has select the permission of "Allow only the creator to see the status of everyone’s answers" or "Allow only the creator to see the everyone’s answer."
-
Time for responses is displayed.
Click the link of "Change the Questionnaire Period" to change the deadline date and time.
* This link appears only for questionnaire originators.
* This link does not appear for completed questionnaires.
* You can change the start date for Questionnaire Period until the date has passed.
-
You can add a new cabinet item of the minutes by clicking "Cabinet" here.
Please refer to the explanation of Cabinet for more details.
-
The date/time registered and the originator of questionnaire are displayed.
-
The content of the questionnaire is displayed.
Send a response.
(Please refer to To Send Response for more details)
-
The date/time registered and originator (created by) of the questionnaire are displayed.
If the questionnaire has been updated, the date/time updated is also displayed.
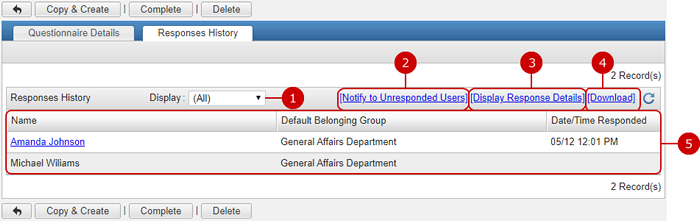
- "Responses History" Tab
-
Display responses that match the conditions. (Narrow down)
(All)... All users are displayed.
Responded... Users who have responded are displayed.
Unresponded... Users who have not responded are displayed.
-
You can notify to unresponded users.
When you press "[Notify to Unresponded Users]" link, Notify to Unresponded Users window is displayed.
* [Notify to Unresponded Users] link is not displayed for users other than the originator.
* If a questionnaire is completed, [Notify to Unresponded Users] link is not displayed for the questionnaire.
* If Email Notification option and Whereabouts application cannot be used, [Notify to Unresponded Users] link is not displayed.
-
The list of responses is displayed in a new window.
* You can use the function if you are allowed to view the responses.
-
Download responses to a CSV file.
* You can use the function if you are allowed to view the responses.
-
The list of recipients is displayed.
When you press a link of the name, the response detail screen is displayed.
- Change Questionnaire Period
Click the link of "Change the Questionnaire Period" to change the time for responses.
* This link appears only for questionnaire originators.
* This link does not appear for completed questionnaires.
* You can change the start date for Questionnaire Period until the date has passed.
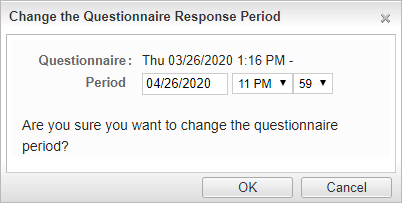
Click "OK" button to save the start/end dates and times.
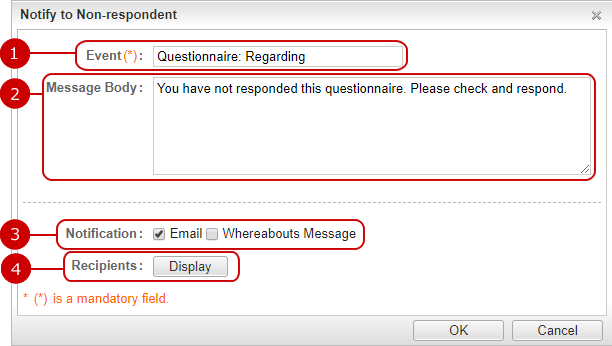
- To Notify to Unresponded Users
When you press [Notify to Unresponded Users] link, Notify to Non-respondent screen is displayed.
* [Notify to Unresponded Users] link is not displayed for users other than the originator.
* If a questionnaire is completed, [Notify to Unresponded Users] link is not displayed for the questionnaire.
* If Email Notification option and Whereabouts application cannot be used, [Notify to Unresponded Users] link is not displayed.
-
Enter a title.
-
Enter message text.
-
Choose how to notify.
Choose either Email or Whereabouts Message.
* If Email Notification option is set to "Do Not Use" by the administrator, Email option is not displayed.
* If Whereabouts application is set to "Do Not Use", Whereabouts Message option is not displayed.
-
Recipients are displayed.
Click "Display" to see non-respondents among the recipients of the questionnaire.
Uncheck a checkbox to remove its user from the notification recipient list.
When you press "OK" button, a notification is sent by using the method you selected.
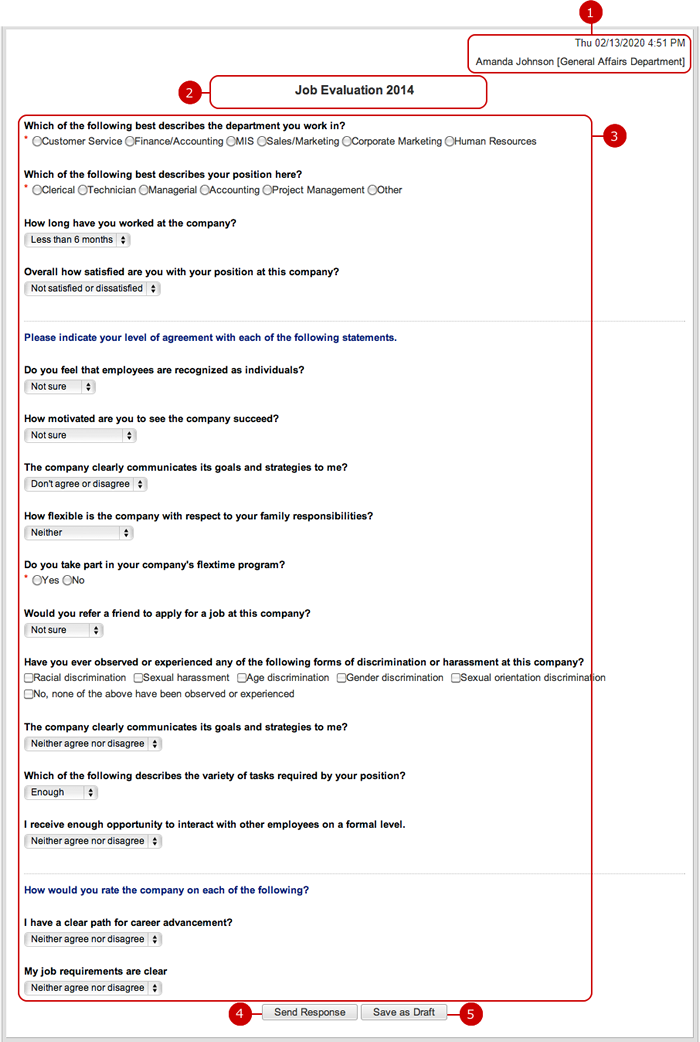
To Send Response
Send a response from the questionnaire details screen.
-
The date/time registered and the originator of questionnaire are displayed.
-
The title of the questionnaire is displayed.
The priority is displayed before the title.
-
The content of the questionnaire is displayed.
The questionnaire is displayed
Enter or choose answers according to questions.
-
Send a response.
The questionnaire you have responded are filtered into Responses History of Received in Received Questionnaires.
-
Save the entries as a draft.
Questionnaire being responded can be saved as a draft.
- In The Case of Anonymous Response
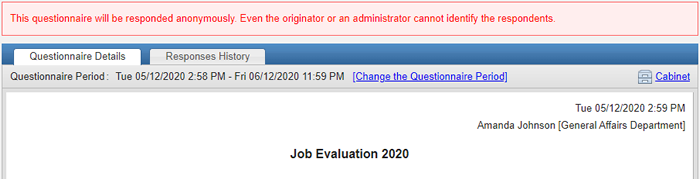
If Anonymous Response option is set to a questionnaire, guidance is displayed the top of the detail screen and Responses History are not displayed.
Name and Date/Time Responded filed are not displayed and Response No. filed is displayed in Responses List.
* Response No. instead of Name and Date/Time Responded filed is output to a CSV file when you download the questionnaire.
* In case of anonymous response, the originator and administrators can not identify the respondents.
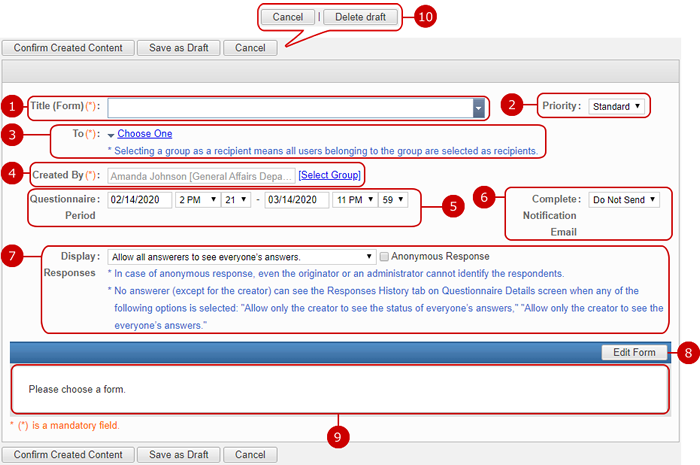
To Create Questionnaire
When you press "Create Questionnaire" button, Create Questionnaire screen is displayed.
-
Enter a title of the questionnaire.
When you press ▼, you can choose any one of titles/forms you and your administrators created.
If you want to enter a title individually, enter the title in the input field.
* If no title/form has been created, the selection is not displayed when you press ▼.
-
Choose a priority of the questionnaire.
-
Set recipients of the questionnaire.
When you press "Choose One", the following choices are displayed.
-
Enter an originator (Created By).
You can enter the information as an originator freely.
If you do not enter the field, your name and belonging group are set as an originator.
You can also choose a group in the group selection window which is displayed when you press the link of "Select Group".
-
Enter a deadline.
When you click an entry field, a calendar will be displayed. Click a date on the calendar, and it will be set to the field.
* A questionnaire is automatically completed when its deadline has passed.
* That questionnaire may remain not completed for minutes because the process to complete questionnaires occurs every five minutes.
* Enter a date in MM/dd/yyyy format, numeric.
* The initial display value is the one set in "Default value for Questionnaire Period" in [Personal Settings > Display Settings] and [System Management > General Settings].
-
Set whether to receive Complete Notification Email.
Complete Notification Email is sent when the questionnaire is completed by all of the recipients finishing responding or the deadline passing.
* Although you can set the questionnaire end time in minutes, the Complete Notification Email may not be sent right on time because the process to send notifications occurs every five minutes.
-
Set whether to display responses for other users.
In addition, if you check "Anonymous Response", respondents are anonymous.
* In case of anonymous response, the originator and administrators can not identify the respondents.
* Even the questionnaire creator cannot see the answers if "Allow only the creator to see the status of everyone’s answers" is selected. Who can read the answers are the administrator and the application administrators.
-
Edit a form.
When you press the button, the screen to edit the form is displayed.
You can edit the content based on the title/form you selected, or create your original content.
(For more information, please refer to All Common Functions for All Screens > Form settings .)
-
The content of the questionnaire is displayed.
-
Delete draft.
* The "Delete draft" button in the [Create Questionnaire] screen is only displayed when the questionnaire was saved as a draft.
After all entries are completed, when you press "Confirm Created Content" button, Confirm Questionnaire screen is displayed.
When you press "Save as Draft", the questionnaire is saved as a draft.
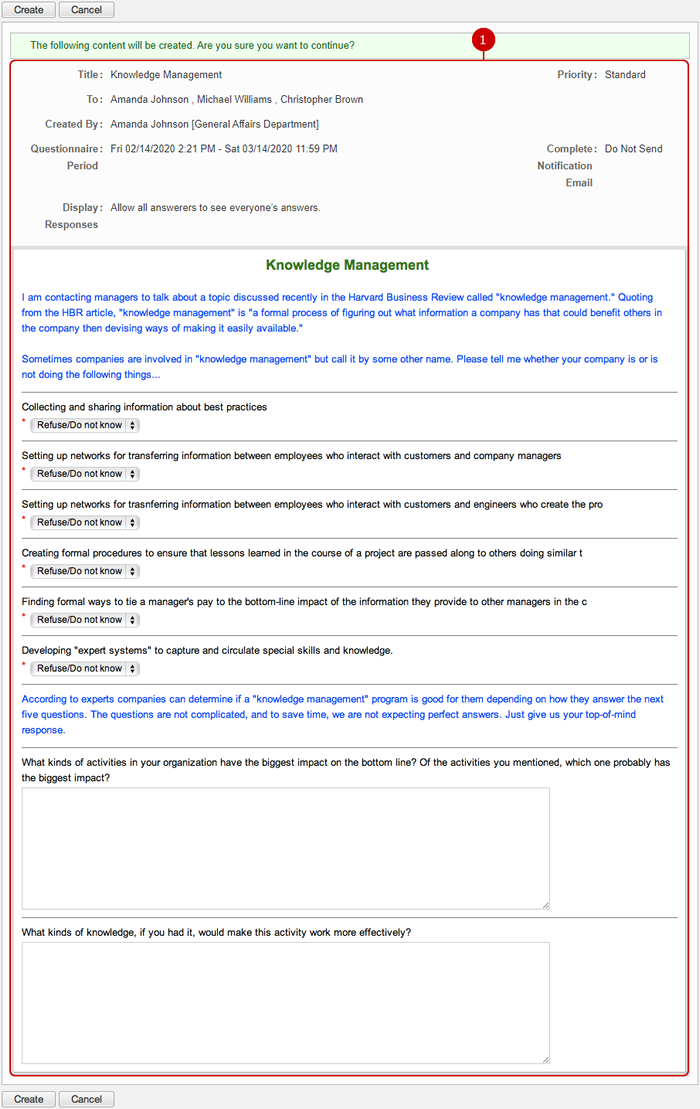
To Confirm Questionnaire
When you press "Confirm Created Content" button, Confirm Questionnaire screen is displayed.
-
The content of the circular/report is displayed.
Press "Create" button to save the data.
To Delete Questionnaires
When you press "Delete" button in the list of questionnaires screen or Questionnaire Detail screen, a confirmation window is displayed.
When you press "Yes" button, the questionnaires are deleted.
If you delete a questionnaire in Received Questionnaires, the only notice of the questionnaire is deleted and the questionnaire itself is not deleted.
If you delete a questionnaire in Sent Questionnaires, the questionnaire itself is deleted and recipients cannot refer the questionnaire.
To Search Questionnaires
When you open the menu on the left side of screen, the questionnaire search function appears.
You can find questionnaires by entering various conditions, such as Title, Status, Keyword, Created By, Priority, Date Created.
* Queued for sending and failed questionnaires are not searched.

-
Choose a title.
The search function searches questionnaires that the title you selected is set.
-
Choose a status.
The search function searches questionnaires that the status you selected is set.
-
Enter keywords.
The search function searches in "Title" and "Title, Value and Unit of Control" by the keywords.
* If you want to specify more than one keyword, use space to separate keywords.
* Specifying multiple keywords will perform "OR" search. This means the search results contain either one or more keywords that you specified.
-
Enter a name of an originator.
-
Choose a priority.
The search function searches questionnaires that the priority you selected is set.
-
Specify the date created period to be searched.
When you click an entry field, a calendar will be displayed. Click a date on the calendar, and it will be set to the field.
* Enter a date in MM/dd/yyyy format, numeric.
-
When you press "Search" button, questionnaires that match the search conditions are displayed in the list screen.
-
When you press [
 ] button, all search conditions are cleared.
