To Setup Individual Access Rights
Access Rights Settings containing users list will appear after you press the Access Rights Settings link in Settings menu.
You can grant the right to read and update presence to other users from this setting screen.
To Grant Access Rights to Users
Click a user name link to open Edit Individual Access Rights screen for the selected user.
Set access rights of presence to other users, groups or roles.

-
Select users, groups, and/or roles to grant access rights.
Click "Select User/Group/Role" button to open the selection dialog.
Select the users, groups, or role to give access rights to.
(For more details, please refer Common Functions for All Screens > Selecting User/Group/Role in User's Manual.)
-
Change Rights opens Change Rights window to set the access rights on selected users, groups, and roles in the list below.
Select the users, groups, or role to set access rights and click "Change Rights" to open Change Rights setting window.
-
Unselect removes selected users, groups, and roles in the list below.
-
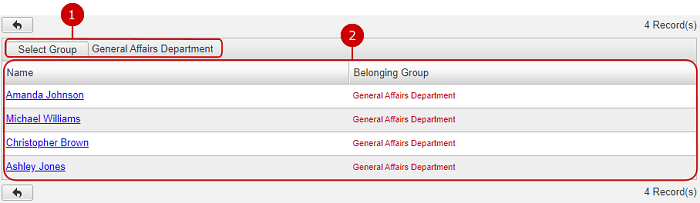
This is the list of users, groups, and roles you will grant access rights.
Belonging Group, Conditions, and Rights of users, groups, and/or roles is displayed.
A user row would show its belonging group in Belonging Group column.
A group row would show its parents group path in Belonging Group column.
A role row would show its remarks in Belonging Group column.
A group row shows a Condition "Include Subordinates", if the selected group is set to include subordinates.
* If you choose to include subordinates, the sub groups contained in the selected groups will also affected by the access rights.
A group row shows a Condition "Exclude Subordinates", if the selected group is set to exclude subordinates.
* If you choose to exclude subordinates, the sub groups contained in the selected groups will not be affected by the access rights.
Click "Update" button to save the changes.
- About Change Rights
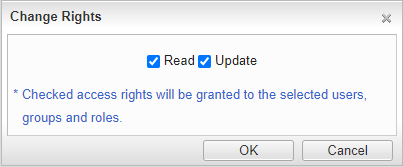
There are two access rights: "Read" and "Update".
-
Read: Selected users/groups/roles can refer to your presence.
* If "Read" access right is not set, you cannot set "Update" access right. If you remove "Read" right, the user/group/role is removed automatically from the list.
* You cannot remove "Everyone(All Users)", nor add "Update" access right to it.
-
Change: Selected users, groups and roles can change your presence.
Click "OK" button to complete the settings.
To Setup Individual Access Rights for Users in One Batch
Click "Copy & Add" in Edit Individual Access Rights screen to display "Select User" button.
You can set the same access rights to the users you selected using this feature.

Setting procedure is the same as how to setup for one user.
Click "Update" button to save the changes.
To Setup Workplace
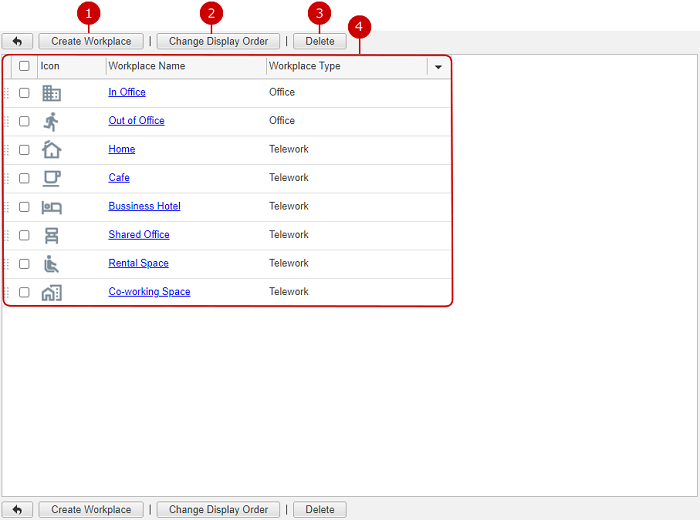
Click "Workplace Settings" of Settings Menu to go to Workplace Settings list screen.
You can add, edit, and delete workplaces used in presence here.
You can also change the icon used for each workplace.
To Create a Workplace
Click the "Create Workplace" button on Workplace Settings list screen to open Create Workplace screen for adding a new workplace.

-
Enter workplace name.
-
Choose the workplace type.
-
Upload a workplace icon file.
Please specify an icon file to be added.
* The icon will be displayed in 28 x 28 pixels.
Click "Create" to save and create the data.
To Edit a Workplace
Click the link of a workplace name to open the Edit Workplace screen.
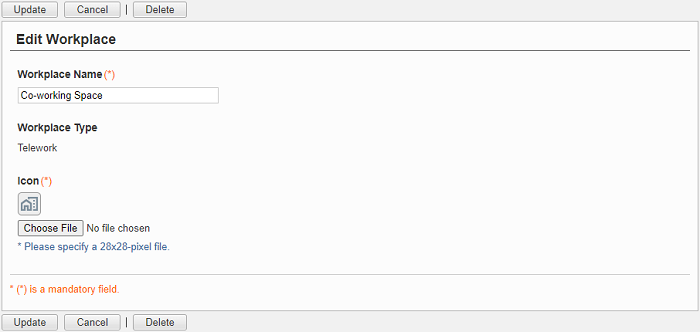
Click "Update" button to save the changes.
To Delete a Workplace
When you press "Delete" button on Workplace Settings list screen or Edit Workplace screen, a confirmation window appears.
When you press "Yes" button, the workplace(s) will be deleted. The deleted workplace(s) cannot be restored. Please take note.
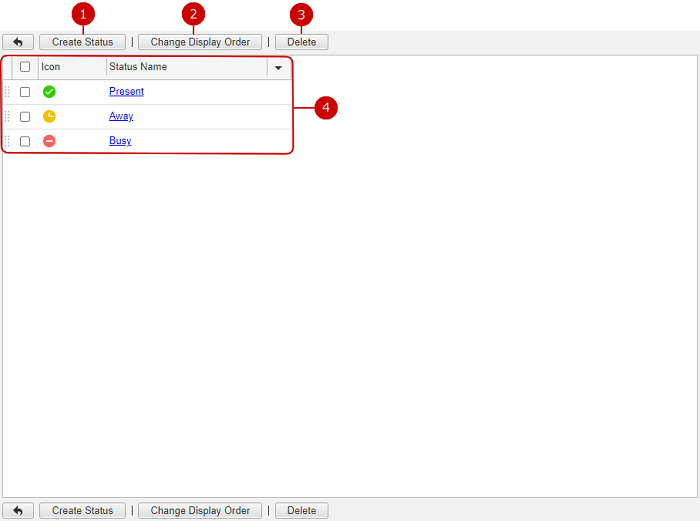
To Setup Status
Click "Status Settings" of Settings Menu to go to Status Settings list screen.
You can add, edit, and delete statuses used in presence here.
You can also change the icon used for each status.
-
Click to create a new status.
-
Change the display order of statuses you selected.
Choose items which you want to change the order from the list and then press "Change Display Order" button to switch the screen mode to Change Display Order mode.
In that mode, click where to move the selected items to. You can select more than one statuses.
* You can also press and hold down the mouse button over the data you want to move, position the mouse onto the desired place and release the mouse button to change the display order.
-
Click to delete status.
Select the one you want to delete from the list and click this button to delete it. You can select and delete more than one statuses.
* "Present", "Away" and "Busy" statuses are created during installation and cannot be deleted.
-
List of statuses.
Icon and Status Name are displayed.
Click the link of a status name to open the Edit Status screen.
- About user status during checking in and out
User status will default to "Present" after checking in.
User status will changed to "Away" automatically after checking out.
"Present" and "Away" status name and icon will be different from this manual if it is changed by your system administrators.
(For more details regarding checking in and out, please refer
Presence > Performing Check-in , or
Presence > Performing Checkout in User's Manual.)
To Create a Status
Click "Create Status" button on Status Settings list screen to open Create Status screen for adding a new status.
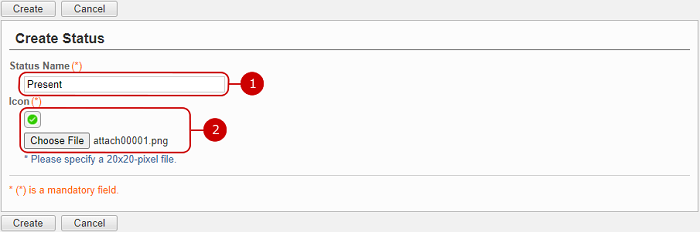
Click "Create" to save and create the data.
To Edit a Status
Click the link of a status name to open the Edit Status screen.

Click "Update" button to save the changes.
To Delete a Status
When you press "Delete" button on Status Settings list screen or Edit Status screen, a confirmation window appears.
The status will be deleted right after clicking "Yes." Be careful about deleting tasks because you can never get the deleted data back. The tasks will be permanently deleted and cannot be recovered. Please take note.
* "Present", "Away" and "Busy" statuses are created during installation and cannot be deleted.
