To See Current Settings
When you press the link of Current Settings in Settings menu, Current Settings screen is displayed.
You can check the status of various settings of File Transfer.
-
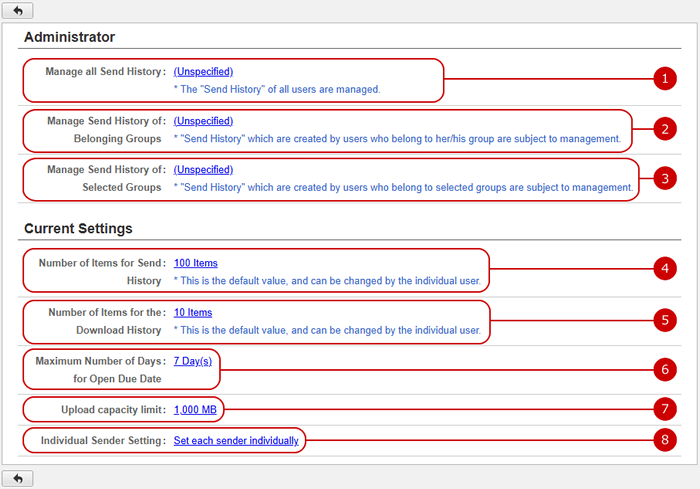
The current settings status of the application administrators who manage all Send History is displayed.
Click the link to go to Administrator Settings screen.
-
The current setting status of the application administrator who manages only the Sending History of the groups to which they belong is displayed.
Click the link to go to Administrator Settings screen.
-
The current setting status of the application administrator who manages only the Sending History of the selected groups to which they belong is displayed.
Click the link to go to Administrator Settings screen.
-
The setting value of the number of Send History items for display is displayed.
Click the link to go to General Settings page.
-
The setting value of the number of Download History items for display is displayed.
Click the link to go to General Settings page.
-
Setting value of Maximum Number of Days for Open Due Date is displayed.
Click the link to go to General Settings page.
-
The setting value of Upload capacity limit is displayed.
Click the link to go to General Settings page.
-
Display the Sender Setting for each individual.
Click the link to go to General Settings page.
-
The setting value of "Password" when Sending is displayed.
Click the link to go to General Settings page.
-
The value of Default "Password" when Sending is displayed.
Click the link to go to General Settings page.
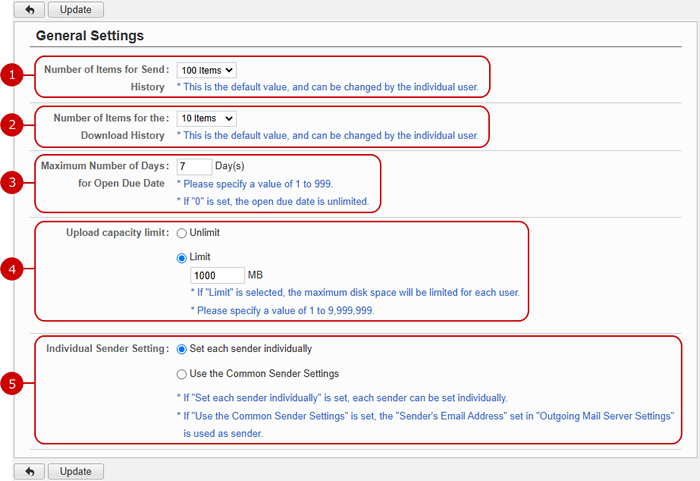
To Setup General Settings
When you press the link, General Settings screen is displayed.
You can configure the general settings of File Transfer.
-
Set the number of Send History items for display
*This value can be changed by individual user.
-
Set the number of Download History items for display.
*This value can be changed by individual user.
-
Set Maximum Number of Days for Open Due Date.
*This value is specified in the range of 0 to 999.
*If "0" is set, the open due date is unlimited.
*From the Start Date, selection will be available until x days after the set date.
-
Set the Upload capacity limit.
*If "Limit" is selected, the maximum disk space will be limited for each user.
*This value is specified in the range of 1 to 9,999,999.
-
Set the Sender Setting for each individual.
*If "Set each sender individually" is set, each sender can be set individually.
*If "Use the Common Sender Settings" is set, the "Sender's Email Address" set in "Outgoing Mail Server Settings" is used as sender.
-
Set the "Password" when Sending.
* If you choose "Make it mandatory", the "Password" field will be mandatory when sending a file.
-
Set the Default "Password" when Sending.
* This is the default value, and can be changed by the individual user.
Click "Update" button to save the changes.
To Setup Application Administrators
When you press the link of Administrator Settings in Settings menu, Administrator Settings screen is displayed.
You can set the application administrators for File Transfer.
The users who are assigned to the application administrator can use the application management functions.

-
Select user or role to assign as application administrators.
When you press "Select User/Role" button, User/Role Selection window is displayed.
(For more details about user/role selection, please refer to Common Functions for All Screens > User/Group/Role Selection in User's Manual.)
-
Set managed group.
When you press "Set Managed Group" button, Set Managed Group window is displayed.
(Please refer to Set Managed Group for more details.)
-
Unselect users, roles.
-
Users and roles you selected are displayed.
Click "Update" button to save the changes.
To Set Managed Group
Set the groups managed by the application administrator.
You can set the option by "Set Managed Group" button or "Managed Group" menu in the list of the administrators.
- Manage Group window
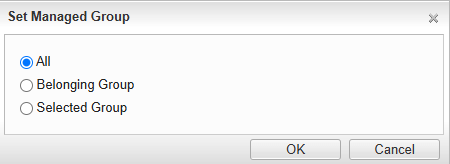
The managed group is applied to the users and roles you selected.
-
All : All Send History can be managed.
-
Belonging Group: The Sending History of groups to which you belong can be managed.
-
Selected Group : Group selection window will be opened and you can select the groups to manage.
Select Managed Group and press "OK" button to apply the setting to the users.
- Edit Managed Group Menu
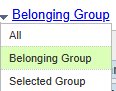
When you press the link of Managed Group, Edit Managed Group Menu is displayed.
Choose the menu item to change the manage group.
Click "Update" button to save the changes.
To Set Outgoing Mail Server
When you press the Outgoing Mail Server Settings link in the Settings Menu, the Outgoing Mail Server Settings screen is displayed.
You can use the mail server settings set by "Settings" - "Mail Server Settings".
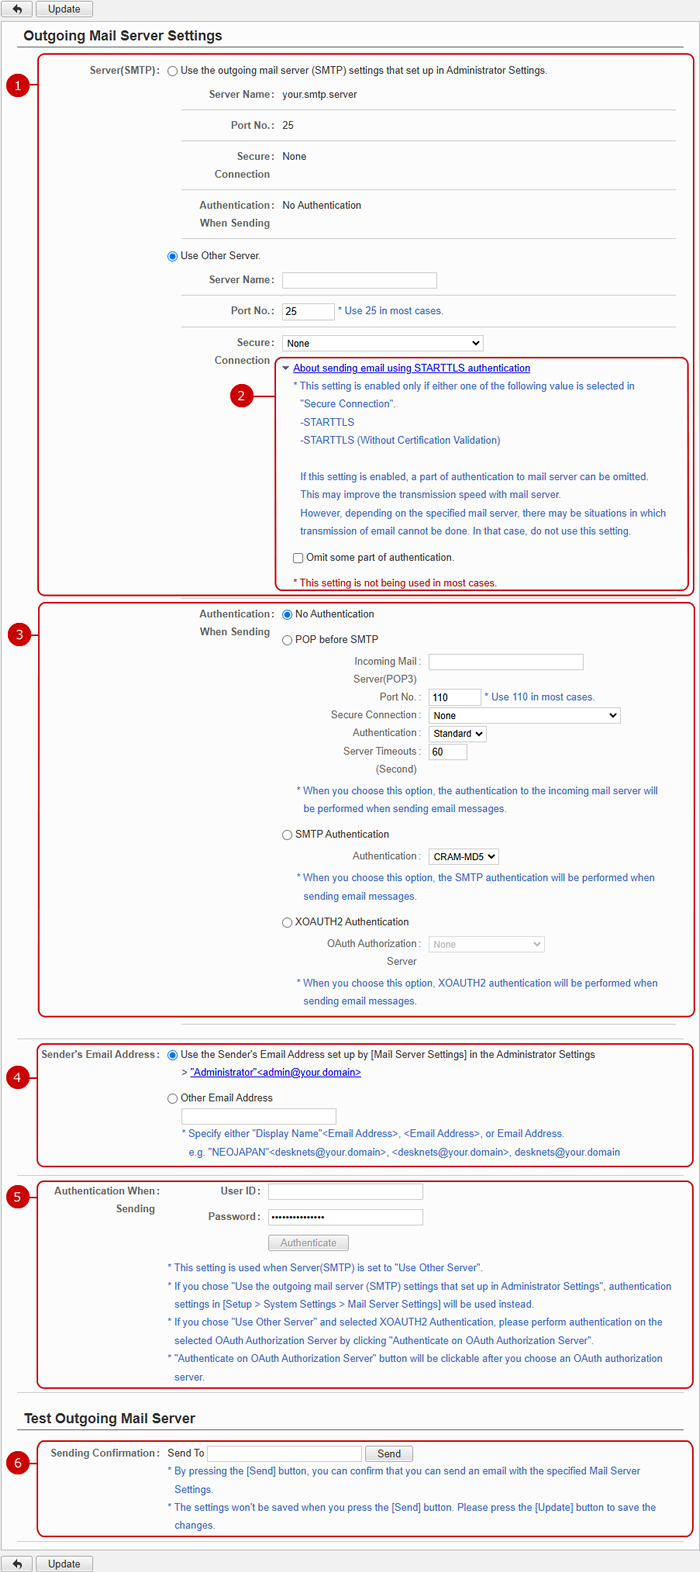
-
Choose any one of the following two outgoing email server settings.
- Use the outgoing mail server (SMTP) setup by the Setup/Mail Server Settings.
- Setup individually.
If you choose "Set up individually", choose a language, time zone and daylight saving time.
* SMTP is a protocol for receiving of email (protocol).
-
Setting up the detail settings during STARTTLS transmission.
This setting is for either one of the following value is selected in "Secure Connection".
- STARTTLS
- STARTTLS (Without Certification Validation)
"Omit some part of authentication" - If this setting is checked, a part of authentication to mail server can be omitted.
This may improve the transmission speed of mail server.
However, depending on the specified mail server, there may be situations in which transmission of email cannot be done.
In that case, do not use this setting.
This setting is not being used in most cases.
-
Choose any one of the following four authentication methods when sending mails.
-
No Authentication
-
POP before SMTP
If you choose POP before SMTP,
Enter a name of incoming mail server, port number, server timeouts, and choose any one of the secure connection options and authentication options.
-
SMTP Authentication
If you choose "SMTP Authentication", choose any one of "CRAM-MD5", "LOGIN", "PLAIN".
-
XOAUTH2 Authentication
If you choose "XOAUTH2 Authentication", choose an OAuth authorization server.
If you use XOAUTH2 for authentication method for Google or Microsoft 365 mail server please select "XOAUTH Authentication".
OAuth authorization server need to be set by the system administrator.
(For more information, please refer to Setup > System Settings > Setting - OAuth Authorization Server in System Management Manual.)
-
Set the "sender" email address of the outgoing mail to be sent from the File Transfer application.
Set the address which is set by "Settings" > "Mail Server Settings" or any other email address.
* If you chose "Other Email Address",
use any one of "display name"<email address>, <email address>, email address format.
Examples: "NEOJAPAN"<desknets@your.domain>, <desknets@your.domain>, desknets@your.domain.
-
Enter authentication information when sending email.
If you chose "POP before SMTP" or "SMTP Authentication", enter user ID and password for authentication.
If you chose "XOAUTH2 Authentication", enter user ID and password for XOAUTH2 authentication and perform authentication on the selected OAuth authorization server by clicking "Authenticate" button.
Clicking "Authenticate" will display Google or Microsoft 365 sign in screen. Please authenticate by signing in into the respective services.
* If you choose any of "POP before SMTP", "SMTP Authentication" or "XOAUTH2 Authentication”, user ID is needed.
* If you are already signed in to Google or Microsoft 365, you will be authenticated using that account. Please check if the signed in account is correct.
If you plan to authenticate multiple settings, please sign out from Google or Microsoft 365 for every authentication.
-
To Send Sending Confirmation Email.
When you enter an email address and press "Send" button, a Sending Confirmation email is sent to the email address.
* An email is sent from a server you specify in Outgoing Mail Server.
*The content is not saved even if you do the Sending Confirmation. After entering the contents, press the [Update] button to save the settings.
Click "Update" button to save the changes.
To Set Email Message Body
When you press the Email Message Body Settings link in the Settings Menu, the Email Message Body Settings screen is displayed.
You can set the body of the email to be used when sending files.
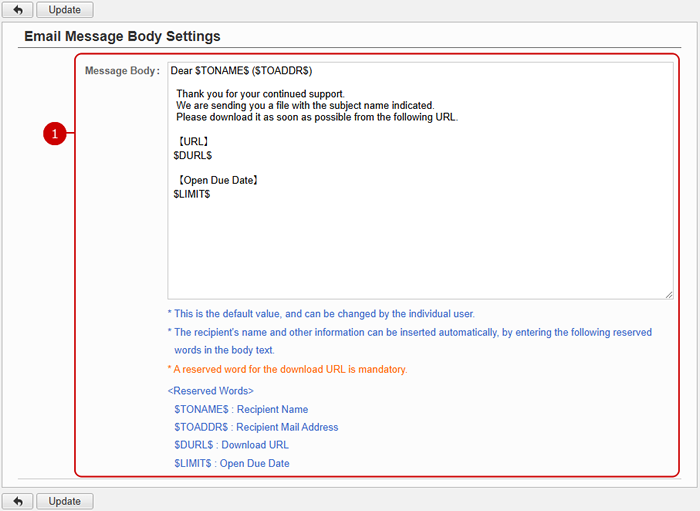
-
Set the initial value of the message body of the email to be used when sending files.
* This value can be changed by individual user.
* The recipient's name and other information can be inserted automatically, by entering the following reserved words in the body text.
* A reserved word for the download URL is mandatory.
<Reserved Words >
- $TONAME$ : Recipient Name
- $TOADDR$ : Recipient Mail Address
- $DURL$ : Download URL
- $LIMIT$ : Open Due Date
Click "Update" button to save the changes.
