►「desknet's NEOアップデートについて」に戻る
1.[Linux+PostgreSQL版]postgresユーザーのパスワード設定
postgresユーザーのパスワードを設定します。
※この後、pg_hba.confファイルの設定を変更する為、postgresユーザーのパスワードが必要になります。
|
[root@localhost ~]# su - postgres
[root@localhost ~]# psql -p 5433
psql (9.6.5)
Type "help" for help.
postgres=# alter role postgres with password 'postgres';
ALTER ROLE
postgres=#
|
|
"psql"コマンドを終了するには\qを入力してください。
2.[Linux+PostgreSQL版]PostgreSQLの接続方法の変更
desknet's NEOのファイル内検索を行うために、PostgreSQLの設定を変更します。
|
[postgres@xxxxxx postgres]$ cd /var/pgsql9.6.5/data
[postgres@xxxxxx data]$ vi pg_hba.conf
|
|
以下の設定を変更してください。
# PostgreSQL Client Authentication Configuration File
# ===================================================
#

(中略)

# TYPE  DATABASE        USER            ADDRESS                 METHOD

# "local" is for Unix domain socket connections only
local   all             all                                     trust ←ここをmd5に変更
# IPv4 local connections:
host    all             all             127.0.0.1/32            trust ←ここをmd5に変更
# IPv6 local connections:
host    all             all             ::1/128                 trust ←ここをmd5に変更
# Allow replication connections from localhost, by a user with the
# replication privilege.
#local   replication     postgres                                trust
#host    replication     postgres        127.0.0.1/32            trust
#host    replication     postgres        ::1/128                 trust
|
|
編集が完了したら、viコマンドの":wq"(保存して閉じる)を実行してください。また、保存した内容を反映します。
|
[postgres@xxxxxx data]$ su -
[root@xxxxxx ~]# service postgresql9.6.5 reload
|
|
3.[Linux+PostgreSQL版] dneoユーザー、dneoftsユーザーのパスワードの設定
desknet's NEOをご利用いただくためにPostgreSQLの接続情報を記述します。
|
[root@xxxxxx ~]# vi /var/www/cgi-bin/dneo/data/app
|
|
以下を変更してください。
dbs=localhost
dbport=5433
dbuser=dneo             ← 追加
dbpwd=desknetsNeo_PgSql ← 追加
ftsdbs=localhost
ftsdbport=5433
ftsdbuser=dneofts       ← 追加
ftsdbpwd=dneofts        ← 追加
|
|
編集が完了したら、viコマンドの":wq"(保存して閉じる)を実行してください。
|
[root@xxxxxx ~]# vi /var/www/cgi-bin/dneo/dneofts/data/app
|
|
以下を変更してください。
dbuser=dneo
dbpwd=desknetsNeo_PgSql  ← dneoユーザーを作成した時のパスワードと違う場合は修正
dbname=dneodb
dbs=localhost
dbport=5433
dbdirfile=/var/www/cgi-bin/dneo/file
ftsdbs=localhost
ftsdbuser=dneofts
ftsdbpwd=dneofts
ftsdbname=dneoftsdb
ftsdbport=5433
|
|
編集が完了したら、viコマンドの":wq"(保存して閉じる)を実行してください。
4.PostgreSQL9.3(9.2)の停止
アップデート元で使用していたPostgreSQL9.3(9.2)を停止します。
desknet's NEO以外のアプリケーションがPostgreSQL9.3(9.2)を使用していない事をご確認の上、停止してください。
併せて自動起動の設定等、不要な設定についても解除して頂いて問題ございません。
Windows版の場合:
1)[コントロール パネル>システムとセキュリティ>管理ツール]からサービスを起動します。
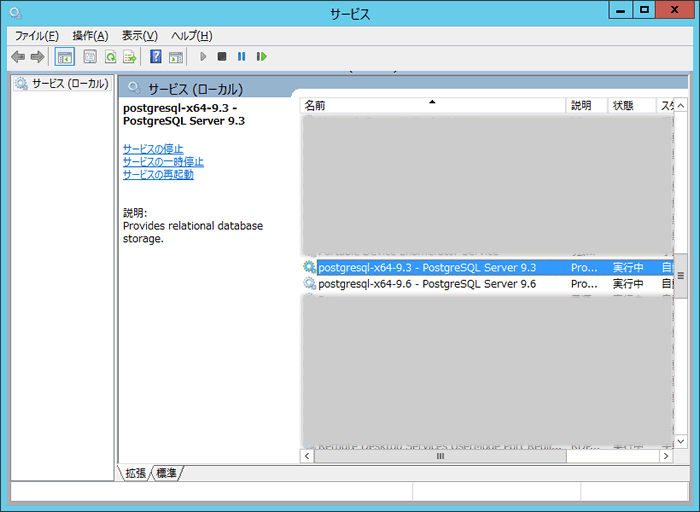
2)サービスの一覧から「postgresql-x64-9.3 - PostgreSQL Server 9.3」をダブルクリックします。
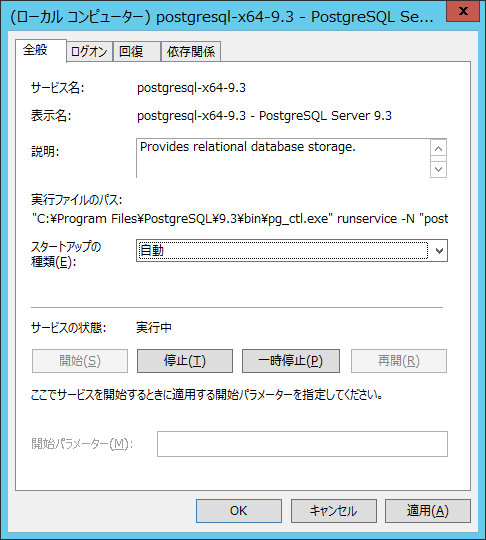
3)「停止」ボタンをクリックして、PostgreSQL9.3(9.2)を停止します。
4)スタートアップの種類を「手動」に変更して「OK」ボタンをクリックして自動起動を停止します。
Linux版の場合:
1)rootユーザーにて以下のコマンドを実行して、PostgreSQL9.3(9.2)を停止します。
|
[root@xxxxxx ~]# service postgresql stop
|
|
2)rootユーザーにて以下のコマンドを実行して、PostgreSQL9.3(9.2)の自動起動スクリプトを停止します。
|
[root@xxxxxx ~]# chkconfig --list | grep postgresql
postgresql      0:off 1:off 2:on 3:on 4:on 5:on 6:off
postgresql9.6.5 0:off 1:off 2:on 3:on 4:on 5:on 6:off
[root@xxxxxx ~]# chkconfig --del postgresql
[root@xxxxxx ~]# chkconfig --list | grep postgresql
postgresql9.6.5 0:off 1:off 2:on 3:on 4:on 5:on 6:off
|
|
5.PostgreSQL9.6のチューニングの実施
PostgreSQL9.6に対しチューニングを実施してください。
チューニング例はこちら
以上で、アップデート後の作業は完了です。
►「desknet's NEOアップデートについて」に戻る

記載の製品名および商品名は、各社の商標、または登録商標です。